"Building in Style"

"Building in Style"
Donations for the REAL Smyth shirt are accepted lol

Sunday, July 29, 2012

Day 6 ~ Adding Lightness

A motto for Lotus for many a year is not to reduce weight, but rather to add lightness. Well, I'm not sure we haven't just reduced weight on this one so far, but my Jetta is looking a bit more Lotus-esque these days. After all my setbacks this weekend I'm feeling good anyway. Having helped move my best friend yesterday, and soaking in some Olympic coverage, it was a busy weekend to get anything done. Nevertheless, the list of removed things increased dramatically today:
Rear shocks
Rear wheels
Rear springs
Rear axle w/calipers, hubs, rotors, etc.
Fuel tank, evap assembly, and filter
Trunk surround cutout
Top and rear shell
  It took me a while to sort out just where to make the rough cuts, referencing the finals. I'm fairly confident with the reciprocating saw, but no sense trying to do the final cut with all that weight on it. I did, however decide to cut out the trunk surround in one cutting before I rough cut and removed the shell. It seems a much easier idea to get that taken care of while everything's still solid and at a working height.

TIP: Removing the rear window proved super helpful in making that cut for the trunk surround. It's really just starting the big horizontal cut that's the issue there. Keep that blade parallel to the ground on that one also so it cuts through only 2 pieces of sheet metal. Goes pretty good here.

TIP: Use standard 9" blades. I tested out the carbide tip blades because I use the regular ones often and wanted to try it. Unfortunately it cuts (grinds really) about an eighth inch wide path instead of about half that, so the cutting takes a lot more pressure and time. Not really worth it in my opinion. I was happy to go through 4 regular blades instead. I did all the rough cuts, and trunk surround in 3, but since I'm working by myself mostly, and occasional help from my super-patient wife (she's pretty strong too, I've found out), I made a few more cuts to take as many manageable pieces off the trunk to save weight. Payed off as I have all that scrap in the bed of my truck now ready for the scrap yard.

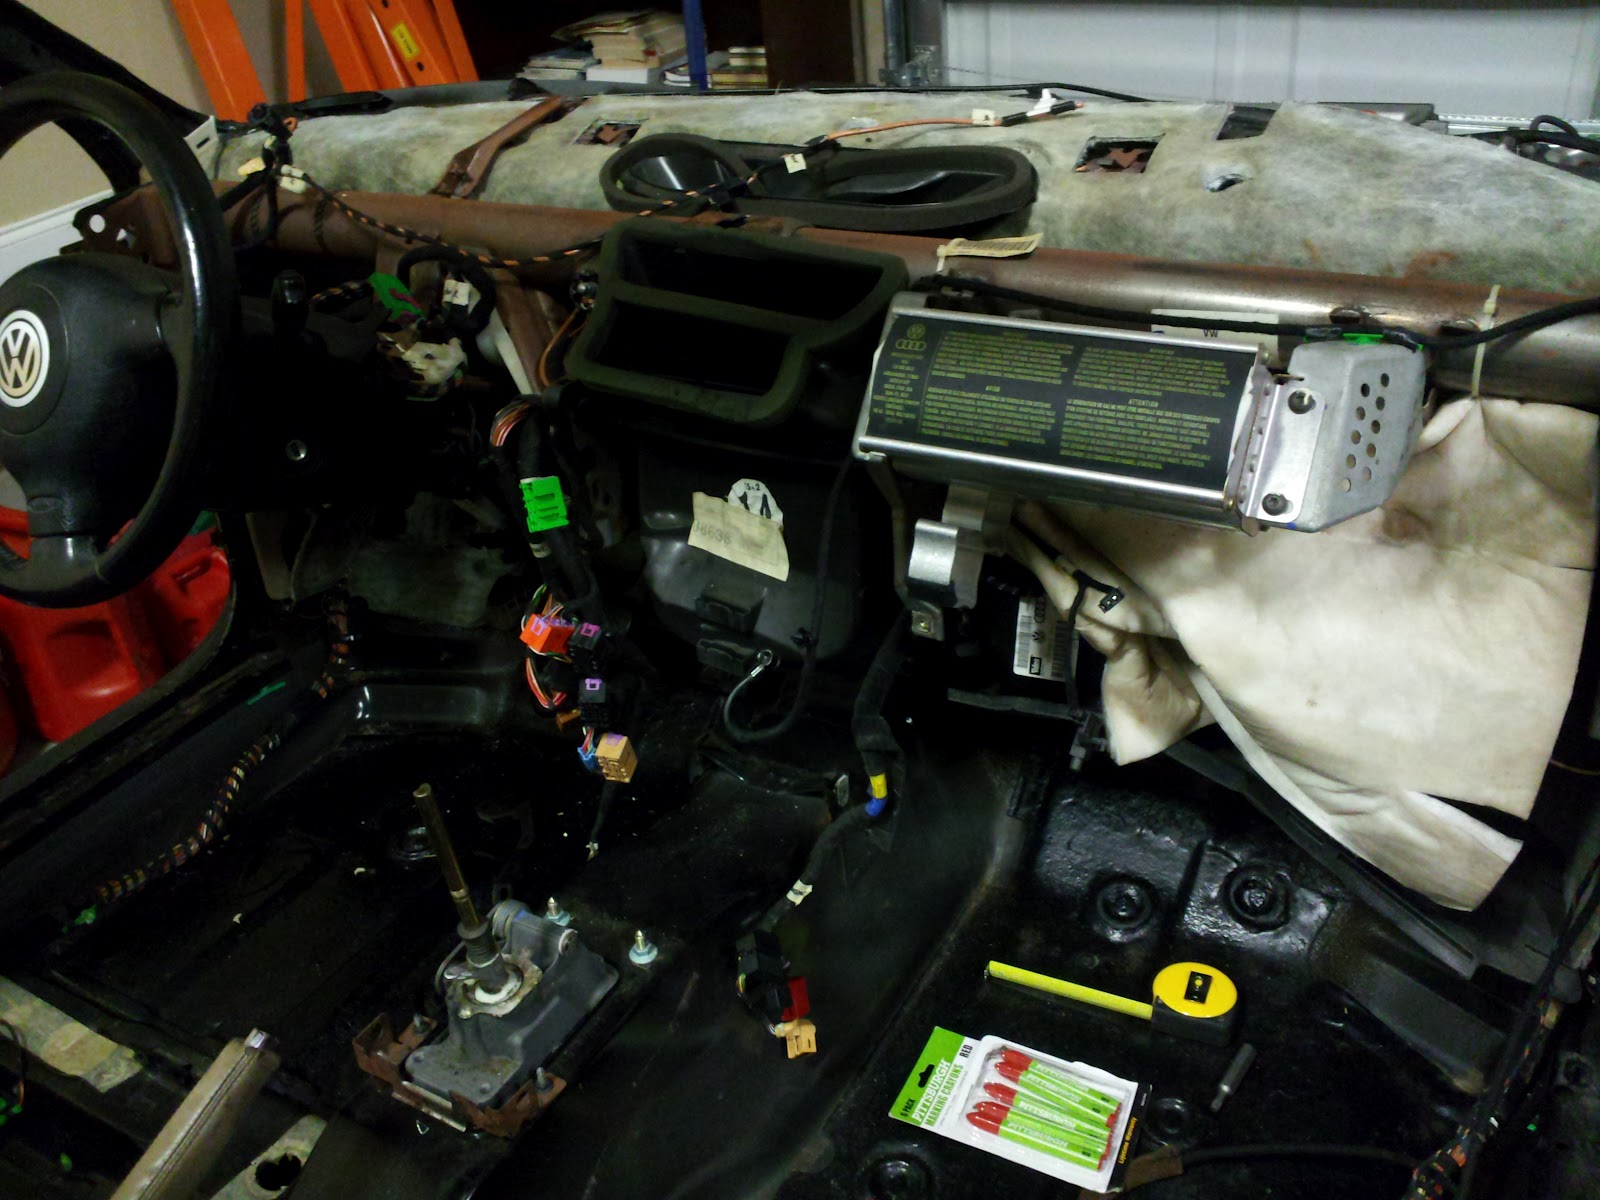
DAISNAIDO: (Do As I Say, Not As I Do) You remember how Mark warns against damaging brake lines as they're hard to replace? Yeah, well I disconnected them at the rear-axle connectors, but apparently I missed a crossover that goes up and backward right along the rough cut for the rear. I got distracted and took a break after the fuel tank was removed. Getting excited about finally getting to the cuts I failed to take one last look from underneath - just to be sure. Well, I guess that "Lines and Fittings" class I took in college will come in handy. I probably wont bother trying to source one out unless I happen to have a spare on one of my other frames. I don't really mind flaring a new tube, but it's definitely not on my recommend list. Remove ALL the brake lines just to be safe. Don't buy into the "I'm gonna get it cut tonight" mentality. You just might rush and skip that one detail like me. Feel free to take the extra time just to check everything again before you start sawing.


  I took a few more pictures than normal that are in my folder, but I want to double check a couple things with Mark before I post much about them. I think I have some helpful notes, but want to pass them through the master filter first just to be sure. Essentially, though the pics will show you where I chose the rough cuts, and you can see from some of them that I picked there because we're trying to avoid those double-layers and welds. Not much sense in a rough cut going through all that extra metal if you can avoid it.
  Also, there should be another video in there that shows 2 segments on the start of my rear rough cut. You might find it helpful if you're going to cut yours soon. The first segment shows the location I chose as a reference, and the second shows a trick to get that 90 degree turn without trying to twist the blade like a crazy man.
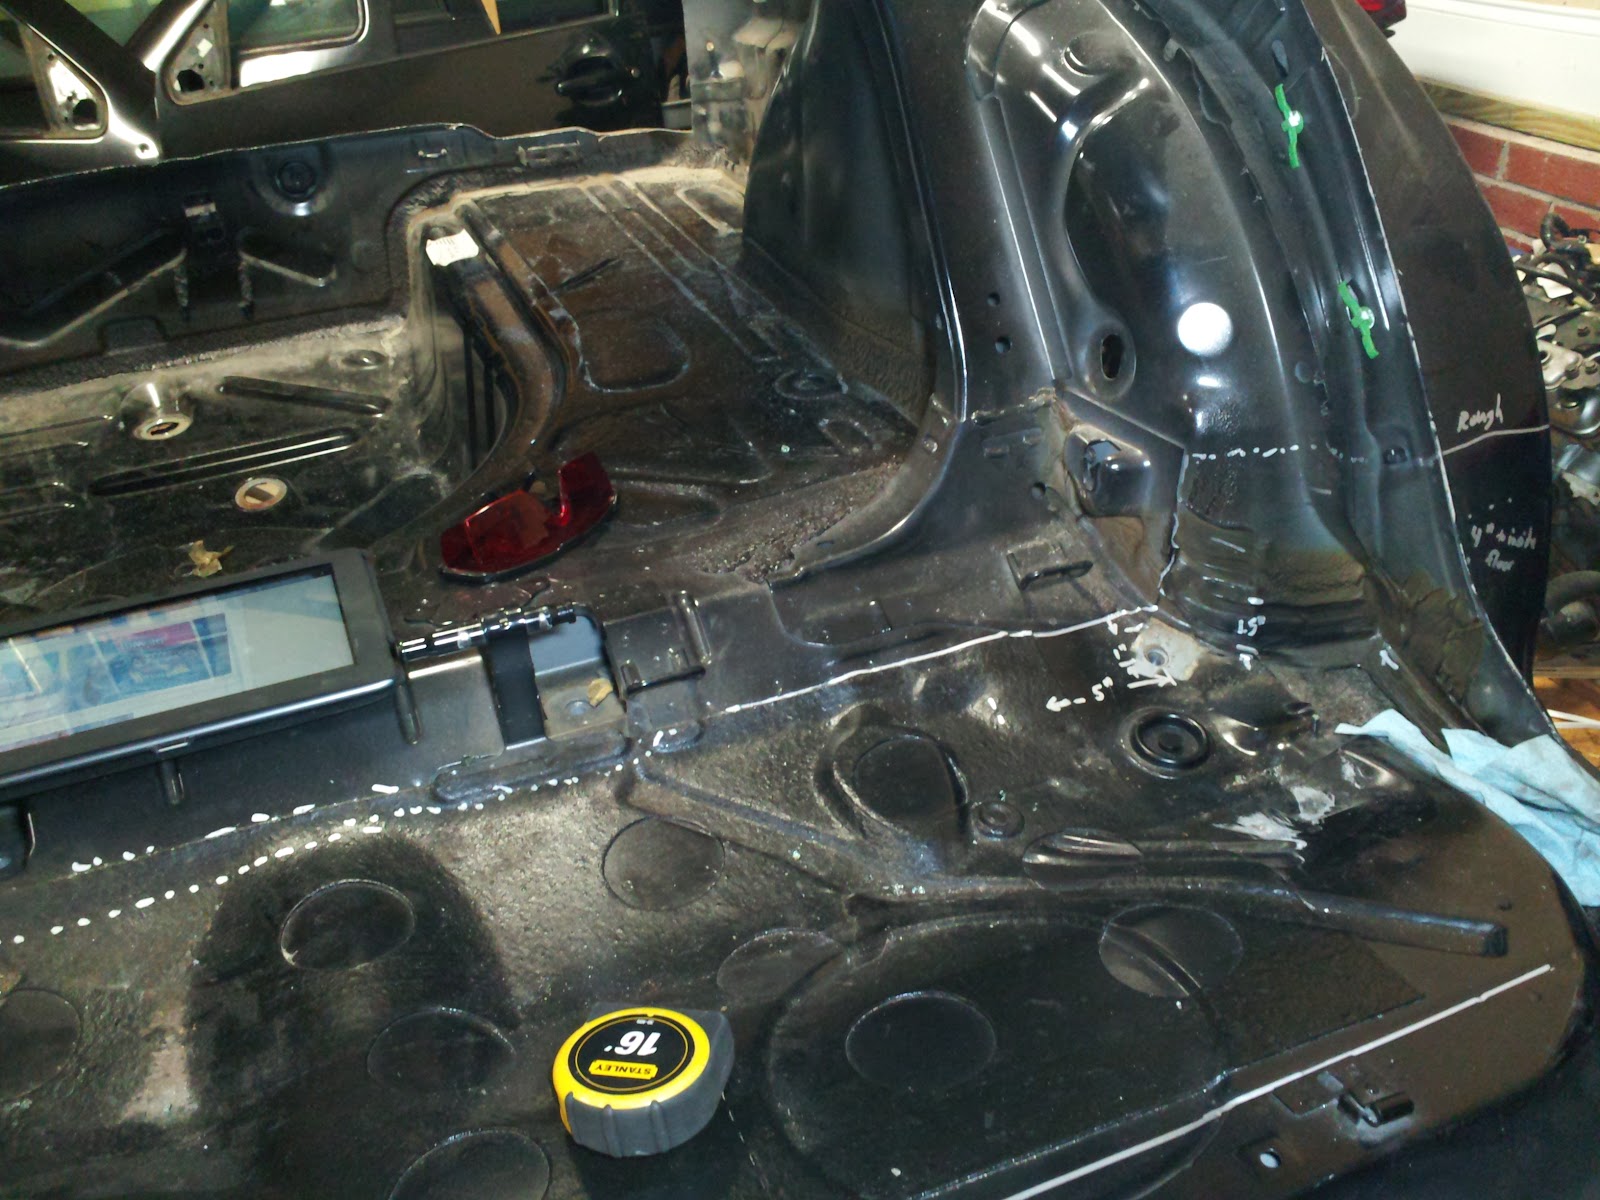
  There is also another picture from the rear that shows my cutout for the trunk surround. You'll notice in that one that on the section below the right tail lamp I made a straight down cut first, then I went back up and cut a little diagonal just wide enough to bend that point down so I could turn the blade horizontal for my right-to-left cut across the bottom. Various other angles show all the other cuts made to get that trunk surround out nicely. I shouldn't have much if any trimming to do. Feel free to cut leaving generous helpings of scrap though if you're not getting the reciprocating saw to do your bidding confidently. You can always use some aviation snips, grinders, or another saw cut to take material off. It's a lot more difficult to add material back in. Be sure of your cut and just roll with it. Buy some extra 5-packs of 9" blades and practice on the roof if you want to figure some curves out before your start. = )

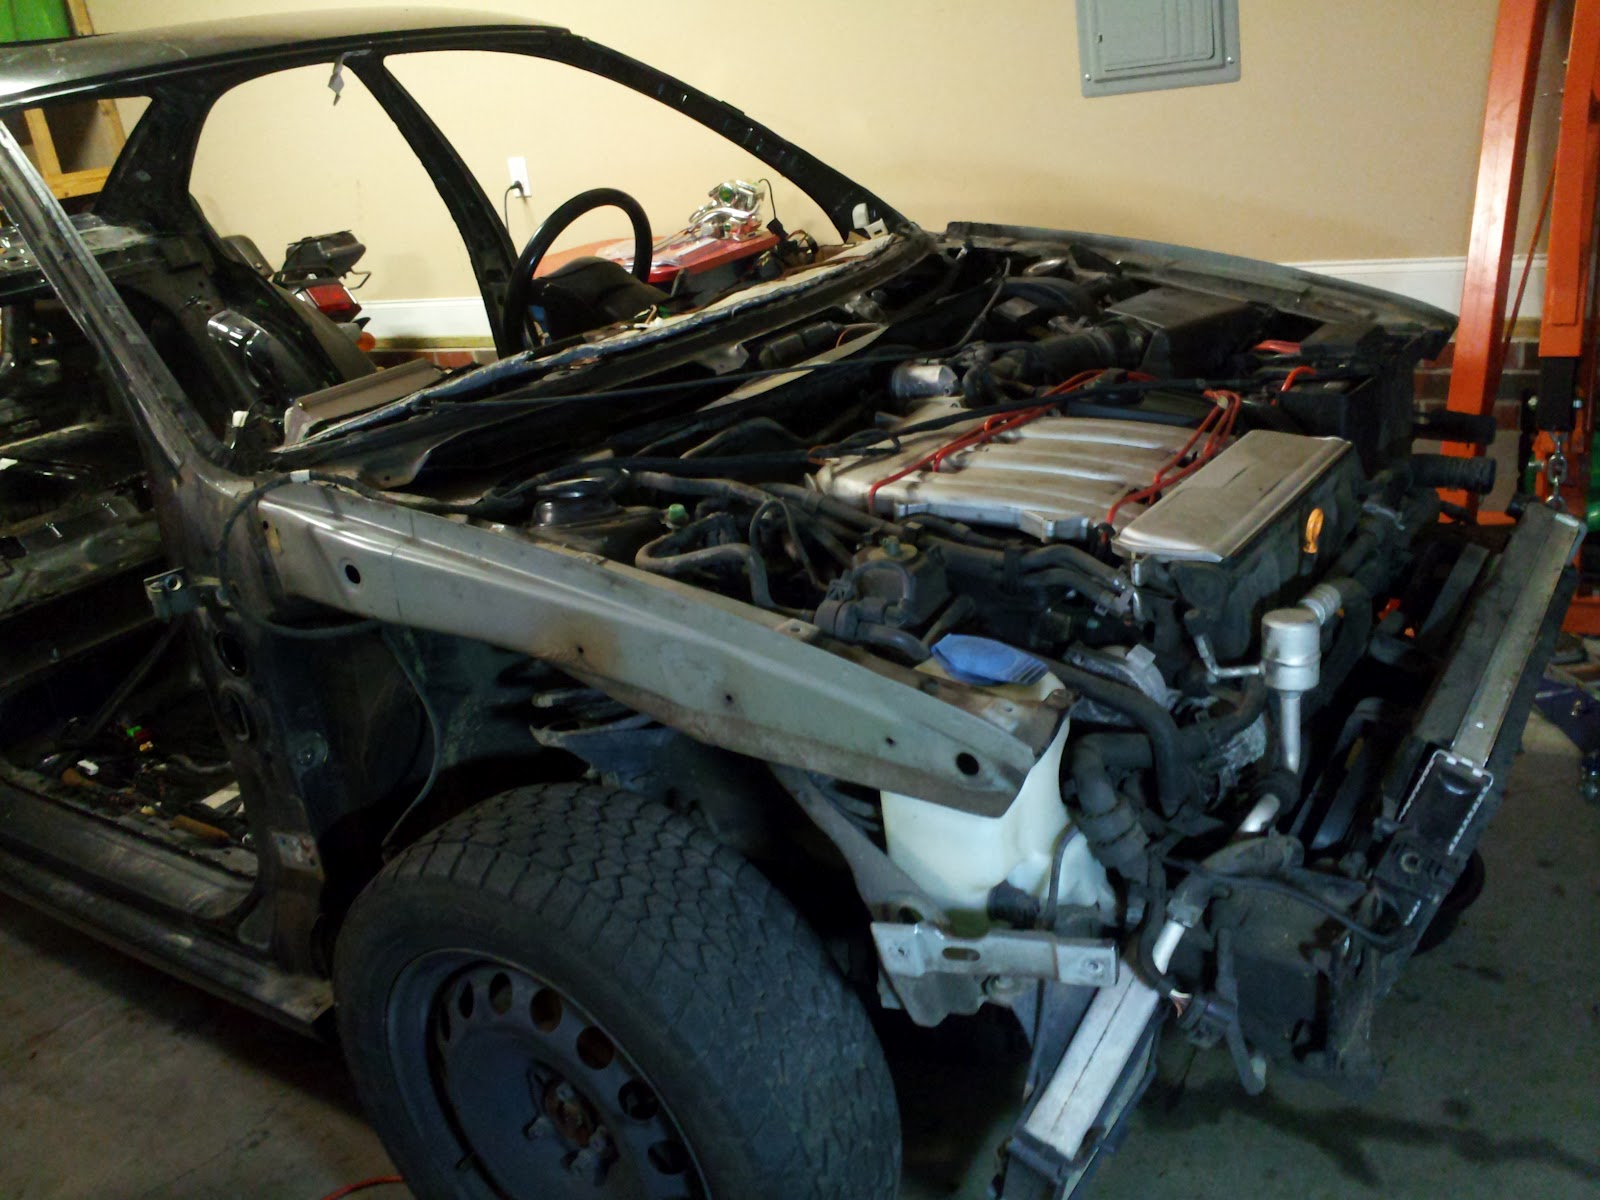
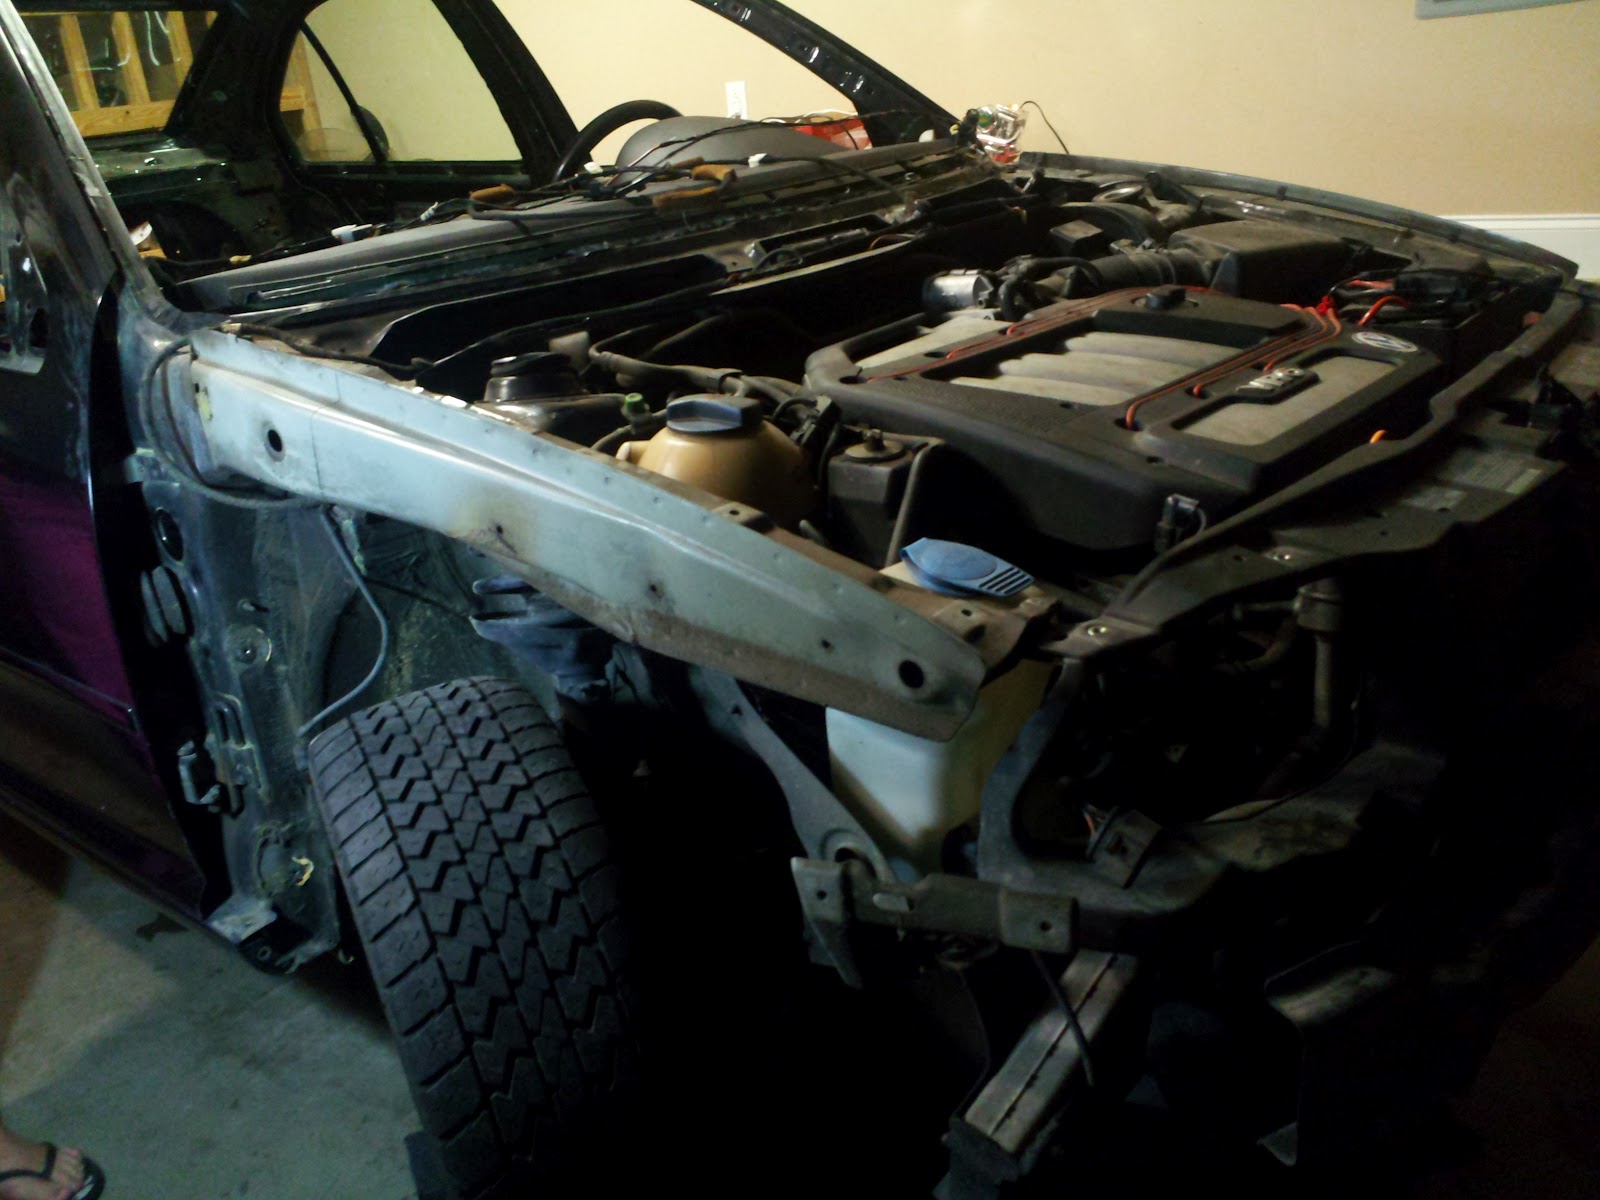
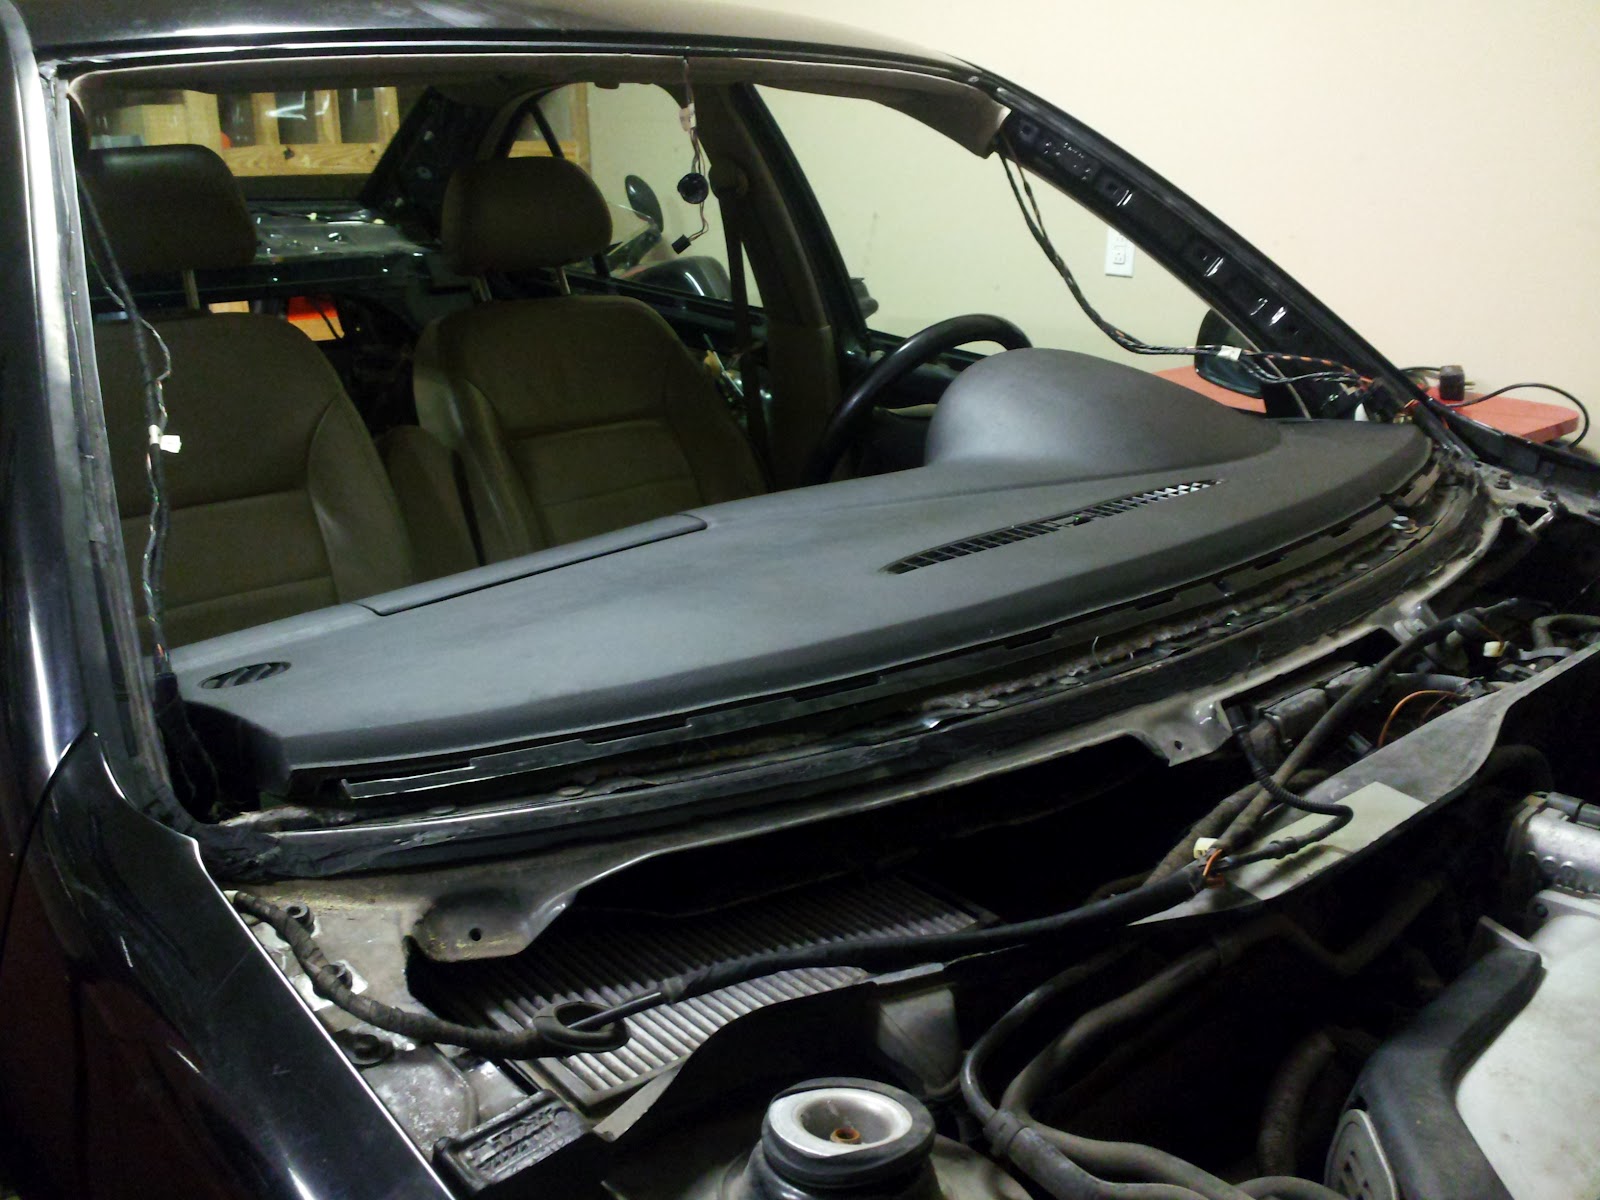
  Well the next things for me should be getting that dash moved out the rest of the way so I can mark and final-cut the front. I'll also be looking to remove the engine (careful to label and cap off all hoses, and label all the wiring up there) so I can make my cuts on the front shock tower areas. I have found a replacement VR6 from a town a couple hours away. I don't have time to pull it, so he's giving me the whole car. The frame is a bit twisted up front, so we won't be saving it for a later project, but I'll cut a trunk and surround out of it, grab the front K member and other steering/suspension bits, and maybe keep the front doors if they're good. After I snaerk all the goodies out, it's off to the scrap yard to get a hundred or two from the sheet metal. It's a good deal, so I'll probably go grab it tomorrow. I'm not likely to post any progress here though as it will likely take all evening to mess with that. I don't have any spare room with all my other projects going on, so condensing that one will have to take priority. Check back mid-week probably for more updates here. Or you can just choose to follow this one via email so it will notify you to click in here as I post progress.

FWIW (for what it's worth) ~ I took the top & rear rough cutaways to the metal yard and weighed in about 240 lbs. of sheet metal. There's a bunch more weight in sound-deadening material and glass that's being removed, but with glass going back in, the reduction will be minimal compared to the sheet steel.

Thursday, July 26, 2012

Day 5 ~ Fail

Well for all the good that went on today, the title still kinda sums up my day anyway. I'll muddle in the woes first and then highlight the progress I made anyway. When it rains, it epic fails I say.
  First sign of impending doom: I removed the dash cover just to be on the safe side for the rough cuts up front and got all the wires except for the keyless entry receiver and snapped the receiver. Oops. I might have known and watched for that had I had the Bentley Manual I ordered some time ago. Grrr. Still waiting for them to ship it. That's the last time I try to save $2 going with Amazon's free shipping super slow sucker saver. Oh well. That's really the first snag I've run into so I guess it's not that bad.
  Next I get all psyched up for my call to confirm final location of my rough cuts (just really giving feedback with Mark to make sure the build pics and instructions given so far are understandable enough to proceed), and wouldn't you know that in all the organizing I did to my garage lately I seem to have misplaced my un-opened box with the reciprocating saw (saws-all). Frustrated and unable to find it, I called Mark anyway and verified what I needed to. Then I decided I couldn't settle for no cutting today, so I grabbed my trusty port-a-band saw. I figured I could at least get the 4 A and B pillars cut and remove the top by cutting from just behind the B pillar top to the rear corner of the sunroof opening (an UNNECESSARY cut if you're doing the build ~ I just wanted to get at least a section off). Long story short, the band saw failed and tore it's drive wheel up just due to age of the rubber. Figures today would be the day. Not to be outdone by fate, I decided to continue with my hack saw since I had nearly 3 cuts finished of the 6 attempted. ((by the way I'm not counting time for the shenanigans I pulled maintaining my bandsaw and making the 2 upper cuts)) Thankfully in order to keep me from working ridiculously hard for no reason (just postpone the cut for a day dummy), my last hacksaw blade snapped.
  Okay, that's it! I'm going to remove the rear glass so I can cut the trunk surround off tomorrow. Since I've had to whine about cuts and pokes every day since the windshield episode (and the wasted time cleaning up the mess all the time), I tried cutting the seal on the glass. I did a pretty good job on most of it, but couldn't get a corner and decided to try to pry it gently. Gently not working . . . upgrade to firmly . . . BOOM! The good news is that the rear glass (unlike the front) is safety glass that crumbles into a million 1/8" balls instead of trillions of shards. Anyway it doesn't take long to clean up the rear window and there's no dash with pockets to catch the mess, so I actually recommend just smashing the rear window, but I still recommend a clean removal of the front windshield.

Enough with the failing already! What went right today? For starters, I got to talk with Mark about all sorts of stuff today, so I'm stoked and ready to rock now. Always a + to talk to the man with the plan.
I removed:


Front and rear doors (got the special tool as a 4 pack at O'Reilly Auto Parts for $6! It's the 12-point "triple square serrated" thigamajig)
Dash cover
Rear glass
Rear bumper
Front bumper
Radiator/condenser coils & headlight bracket
Front seat belts
Radio stack
Gauge cluster
Coolant overflow bottle

I also got to label all the connector groups in the dash for future reference. And I familiarized myself with the rough and final cuts so I'll be able to make headway on them when I borrow the recip saw from work this weekend.
  I still need to remove the fuel tank, exhaust, fuel and brake lines, and any nearby wiring underneath to make room for the rear cuts. Now that I'm not going to be doing any more work on the motor, I can go ahead and remove it too. I'm kinda antsy to get the rough cuts done before I spend a bunch more time removing the engine and labeling all the stinking wiring and hoses. Final cuts up front will have to wait until I've pulled the motor, but I'll be eager to get the rough cuts and maybe some finals done this weekend.
  Oh, and another good thing just for fun today . . . I keep forgetting to pay Mark when I tell him I want a shirt. So go figure I haven't received one yet. No matter, I'll just make one for now. lol

Break Time

Wednesday was super busy for me from get-up to past-bedtime, so I didn't get to call Mark for some clarification, and I didn't get much time to do anything else on the Jetta. I decided to take a break from the actual build, but still get a little work done. The VR6 I bought on the cheap has a few dings in the fenders and rear door, but who cares right? The main issue with it was the previous owner failed to replace bad shocks and still enjoyed railroad tracks and bumpy dirt roads apparently. He scraped and cracked the oil pan and ran it low on oil. I can see the remains of a JB Weld fix, but that got knocked off partially too since he still didn't fix the suspension that was causing his dilemma. Anyway, this non-car-guy apparently ran it low on oil again and caused some engine damage. That was the story between what I was told and what I figured out. So I scrounged some spare parts and put it all back together in the engine compartment, filled the fluids, and gave her a crank. Vroom! clack clack clack clack knock knock knock knock sputter knock die . . . Ok I've officially confirmed for myself that I am indeed going to buy that vr6 engine I've been looking at in the classifieds. I'll use this one for spare parts and scrap the rest unless I have enough to work with to rebuild it someday. . . yeah like I'm going to have time for that. Anyway, now I can stop cutting corners on the official teardown order. I was supposed to disconnect and remove the muffler, fuel tank, lines, engine, etc. but wanted to check on the engine first. I could probably do at least the front rough cuts for now, but we'll see. I'll call Mark in the morning unless he calls me first.

Tuesday, July 24, 2012

Day 4 ~ Finally Bare

4.5 hours in today. Sheesh, getting the thing down to bare bones sheet metal takes a bit longer than I was anticipating, but at least I can finally feel like I'm ready to call in the measurements for cutting. Other than a few connections left in place with the dash and systems (for engine work) all the interior is gone now. I also got the fenders off today too. They're a bit tricky because the undercarriage protection goop clings to them after you've got all the bolts gone.
  Tip: I was able to salvage a lot of the plastic connectors by taking some normal pliers, clamping down on the connector firmly (but gently), and then rolling the pliers along the sheet metal, leveraging a side pull. This gets most of them out without damaging or tearing off the clips so we can reuse most of them later.
  Tip: It bears repeating apparently. Take the time to at least attempt cutting the windshield and rear glass seals after removing all the weather stripping nearby. Hammer-boy here is still spending a lot of time vacuuming when I knock enough shards out of something I'm removing to get cuts and pokes on my hands and knees. No fun there. I think I'm finally over the major part though as there's really only the dash to mess with now before I cut. Then I'll be sweeping metal shavings lol.


Today's Removals:
Front seats
Fenders and splash guards
Glove compartment
Center console
All remaining trim pieces other than dash top and front console
Lower dash brackets
Carpet
Insulation underlayment
Front door inner panels with glass and weather stripping

  I left only the door latch assemblies in tact just so I can open and close them at will for now. I still need the special tool with the splines for getting the front seatbelt retractors and rear doors off, but they're not in my way yet so no biggie.
  Well my pile of removed parts is getting unmanageable, so a bunch is going into storage until I know for sure I won't be using any part of it before I even think about throwing it out or recycling. Tomorrow is definitely looking like a good day to give Mark Smith a ring. = ) I'm getting so close to the beheading party, I can almost feel it! Assuming another evening of finding out things I haven't though of yet needing removal, and a full evening or two doing measuring and marking and final pre-cut prep, I'm setting my beheading goal for this weekend. My best buddy is moving in town Saturday, so that one's out, but between a little Friday and Sunday, the cuts should be posted . . . I hope.

Monday, July 23, 2012

Day 3 ~ Stripping Continues

A lot of tedious but important and informative disassembly again today. With some help from my wife, we traced down, labelled, and removed several sections of wiring harness. We got the roof liner out, sunroof removed, and cleaned up more glass shards. I punctured a finger pretty bad to start things off today, so I'm really recommending trying to remove the glass with the laborious seal-cutting tools. They're a bit tough to use, but I'm going to borrow or buy a set and remove the rear glass that way and let you know how it goes.
  Also, I found I don't have the special tool to remove the rear doors. All the door hardware has what looks to be a TX-40 size bolt only with 12 splines ("star" or "torx" bits have 6). I didn't find one in the VW tool kits I have. Any recommendations before I have to go buy those bits? I'm not sure if we're re-using those particular bolts or using ones provided by Mark for the subframe. If not, I'm using my extractor on them instead of buying a special tool. I'll talk with Mr. Smith and update this when I find out. Of course you other betas who have already been here can comment to let me and my readers know too.
  Another idea I have that may be helpful . . . (posted here only so I can remember to do it) I will begin to put a tool list together of all the necessary tools required for the build so far. Again, other betas you should feel free to add helpful suggestions if you've found some tricks by now. I'll probably try a post here first and keep it updated until it gets crowded out by progress. Then I'll probably put a link to the post in the side bar for easy reference.
  Okay, so 3.5 hours today requires some kind of list to make me feel like I made good progress:
Removed:
Visors, Handles, & Dome Lamps
Headliner
Sunroof
Headlights
Front & Rear Bumpers
Antenna
Trunk Lid Wiring Harness (& labelled all connectors separated so far)
Headliner Wiring Harness
All Doors' Weatherstripping
& various other pieces of trim, connectors, and hardware here and there in prep for more removals
 . . . the pile is getting higher = )
  Other than the fenders, inner fenders, front seats, carpet, rear window, and un-piping some more wiring harness, I'm really getting close to needing some instructions on what and where to mark for the cuts. I'm still want to leave enough in tact to run the engine for now as I have some engine work to do. I'll try to do everything possible without pulling that if I can. Beats an engine stand with electrical and fuel hookups any day.

Saturday, July 21, 2012

Day 2 ~ Gutting Out the Donor

  Today I got right down to business taking the hood, windshield, and trunk off. Other than the things that are already broken or in poor condition, I intend to remove them with some care as to be able to use them on my other Jetta or try to sell them to recover little bits of cost here and there. Let's just say the windshield was not sell-able. Whether you decide to remove it in one piece or destroy it like me, plan on a lot of time unless you have tools and experience with this. The cleanup time about matched the removal, but I won't count the first aid time. Hehe, let me just recommend coveralls, hat, thick leather gloves, and boots. Those darn slivers get everywhere.
  After getting some of the big items out of the way, I went to work on interior trim and stuff. So the rear lights, rear seats, belts, all the door panels, rear trim, and trunk liner are all gone. It sounds a little trite for the 6 hours I spent on it, but I've gotten on a roll now and also got some cleaning done too. I expect the next couple hours to have the head liner, front seats, and the rest of the trim and liners out. I will attack the dash after that.
  By the way, the times tracked in this blog will serve to give the average builder in my perspective an idea of the overall time it may take one to build this project. Others are blogging this build and tracking progress a bit more aggressively which will more accurately reflect a more tool-on-metal timing approach. I'll try to keep up, but if you're doing this yourself or paying someone to do it, you may find it helpful to budget for a wider perspective.


Feel free to rummage through my photos so far.

Friday, July 20, 2012

Day 1 ~ Receive and Inventory the Pallet

  With any new project, excitement juices are flowing! The long-anticipated delivery is finally here. I opted to have the pallet shipped to the "local" terminal an hour away, but saved a couple hundred bucks doing so. It's not a bad deal to pop the pallet in a pickup truck bed. Mark told me it would fit, but since I have a 2002 quad-cab Dakota, I was hesitant on the bed size. Turns out I didn't have to bring the trailer, because it would have fit just fine. That's just FYI for the guys looking to get their own pallet sometime.
  Well I hate to mention the bad news, but what good is a blog if I only tell you the happy fluff. FedEx Freight managed to run a forklift into the beautiful shell that is the rear body and tore a nice 12-14" gash at the top of the wheel well. I immediately texted Mark and called him up for advice. We claimed it on the FedEx form and I was on my way. Mark says it's really no biggie to fix, but if after scrutinizing the damage it seems irreparable, then he'll send me a new one. See so it's not really that bad after all. I have plenty of time and work before I get that far anyway.
  Mark's got a super-busy weekend with the Waterfest show and all, so I'll probably catch up with him early next week on some Q & A. As a late "beta" I'm getting the kit in nearly full-production mode, but we're still developing the build manual is my understanding. So without a "book" I have a few questions like "Where on earth do I start?" Thankfully there's plenty of info online between clarifying pics on multiple facebook albums and the guide at smythperformance.blogspot.com so I'll stay plenty busy before I get stumped. I guess I'm just reasonably cautious and nervous...nah!